Nilay Sheth
ssh around
Sending files directly to a destination without having servers store our useless one-time data sounded more efficient than using services like Google Drive. After paying our monthly broadband fees for the internet infrastructure, it struck me that the internet protocol was free and could be used to route packets directly to a destination, like how the forgotten ftp had always done it. This page lists a few learnings from using the ssh protocol. Also, with the single-board-computer revolution in robotics, many of us dump our logs for analysis using ssh, so these steps could find applications in robotics as well.
Disclaimer: The methods used here are quite preliminary and expose ports of a computer to the internet, increasing vulnerability to attacks. Security is the last thing this page is addressing (literally), there are a few steps mentioned at the end of this page that increase security while still preserving connectivity.
Table of Contents
- ssh around
Chapter 1: Scenario
The paragraph below motivates different ssh methods with the help of a scenario. If you manage to symbolically replace the scenarios below with your problem statement, then the commands listed in this page could be easier to translate for your use-case. In the image below notice the following:
There are three computers and three associated users, (computer A has a user called usera and so on..). The three are connected to the internet in different ways:
-
Ain the red area is a computer at a lab. It is connected to the blue ocean of the internet, but only through a router, which likely goes through a firewall. Maybe a hardware firewall is absent but is used as a placebo to keep people in check. -
Bin the blue area is a friend who is likely commuting, maybe connected to the internet via a cellphone tower (2G/3G/4G). Commands forBwere tested on a smartphone running android OS. -
Cin the grey area is you, with a router connected to an internet service provider (ISP). A router or a modem is a place where change in the physical medium takes place. For e.g. where a wifi/ethernet cable gets converted to a fibre optical cable or a satellite dish connection. In case there is more than one hop (i.e. intermediate router/switch) betweenCand the ISP, one must still have the access to the main router for commands in Chapter 2 to work.
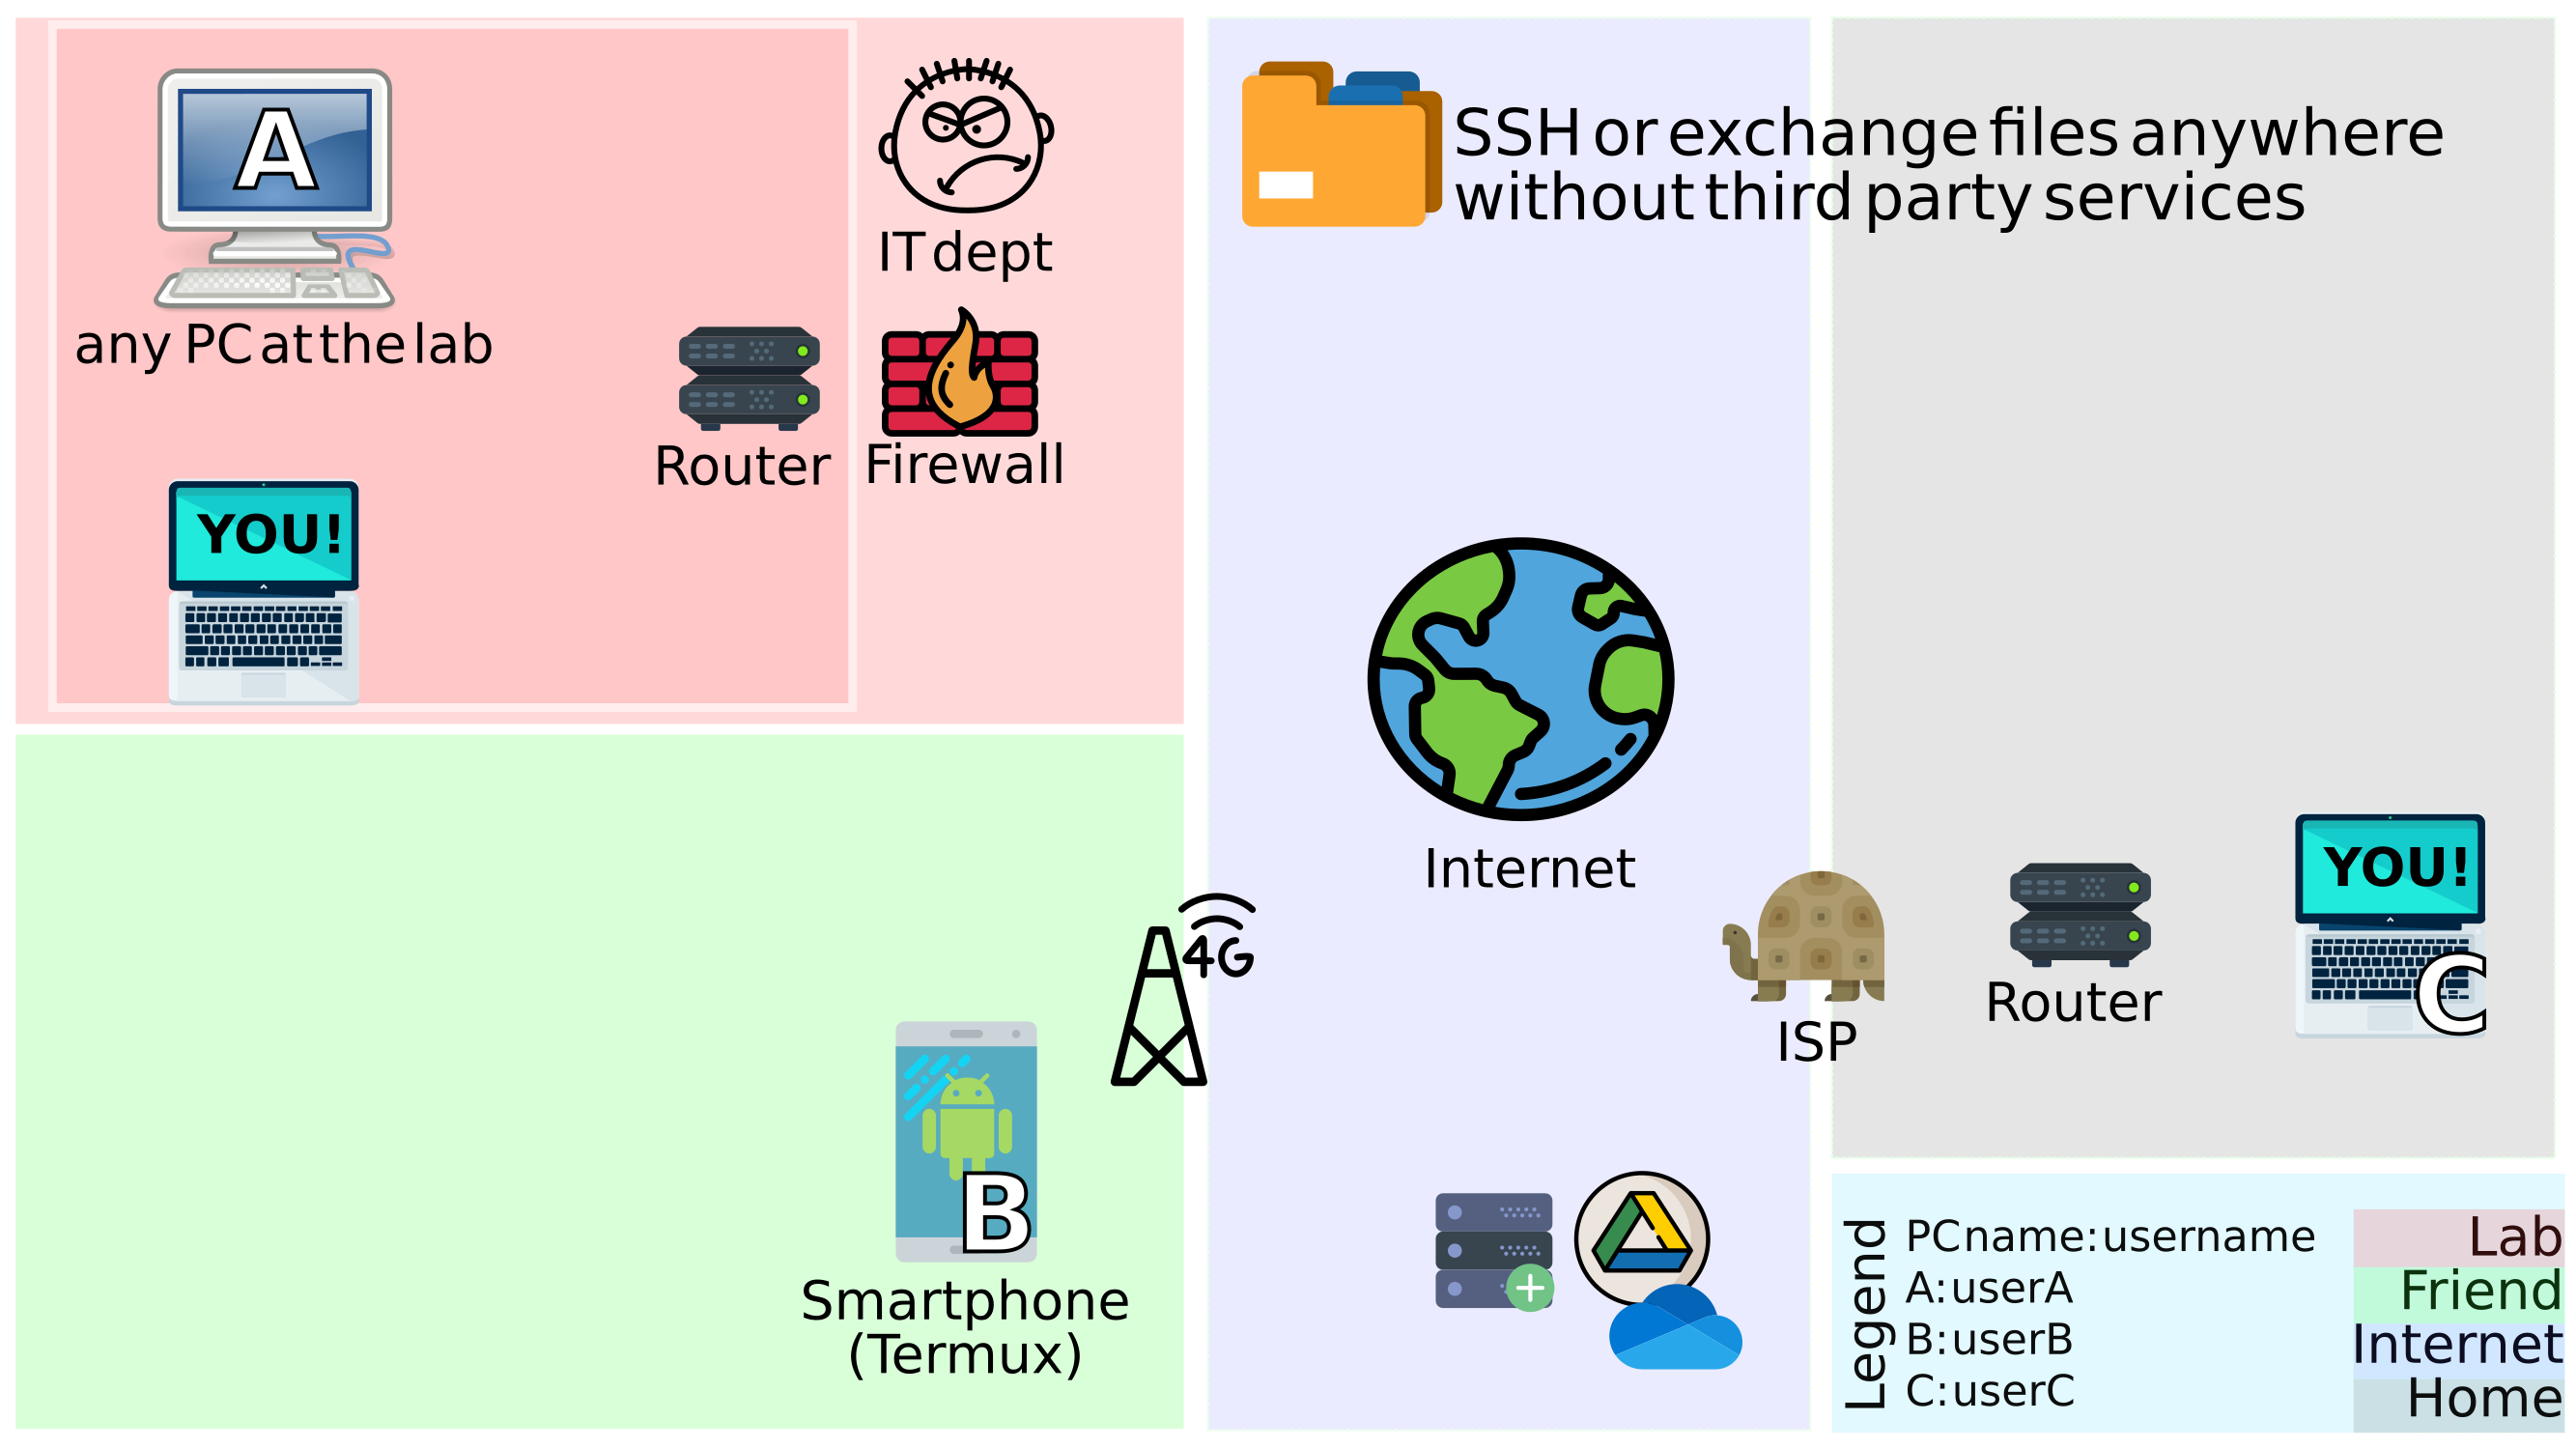
Figure 1: Different computers in different networks wanting to exchange a file
There could be an intermediate hardware-firewall/switch/repeater/hub/router between a computer and the main router if a packet takes more than one hop to surface to an external ip address (see traceroute).
Chapter 2: Low hanging fruit first
In the image below, notice which connections could be established easily and which ones not:
- A connection between
AandCcan be easily made while both are connected to the same router (in the same local network) at work[^1]. Notice the red box aroundAandCwhen at work, indicating they are in the same local area network. - The moment
Cis brought on a different network, i.e. in the grey area, it can no longer connect toA. It also seems like the firewall at the lab might get in the way while getting this to work. - The same goes for
BandC, since they are not on the same local network,sshing into one another isn’t straightforward. But it seems like the IT dept is not here to police around, so let’s try to establish connections betweenBandCfirst.
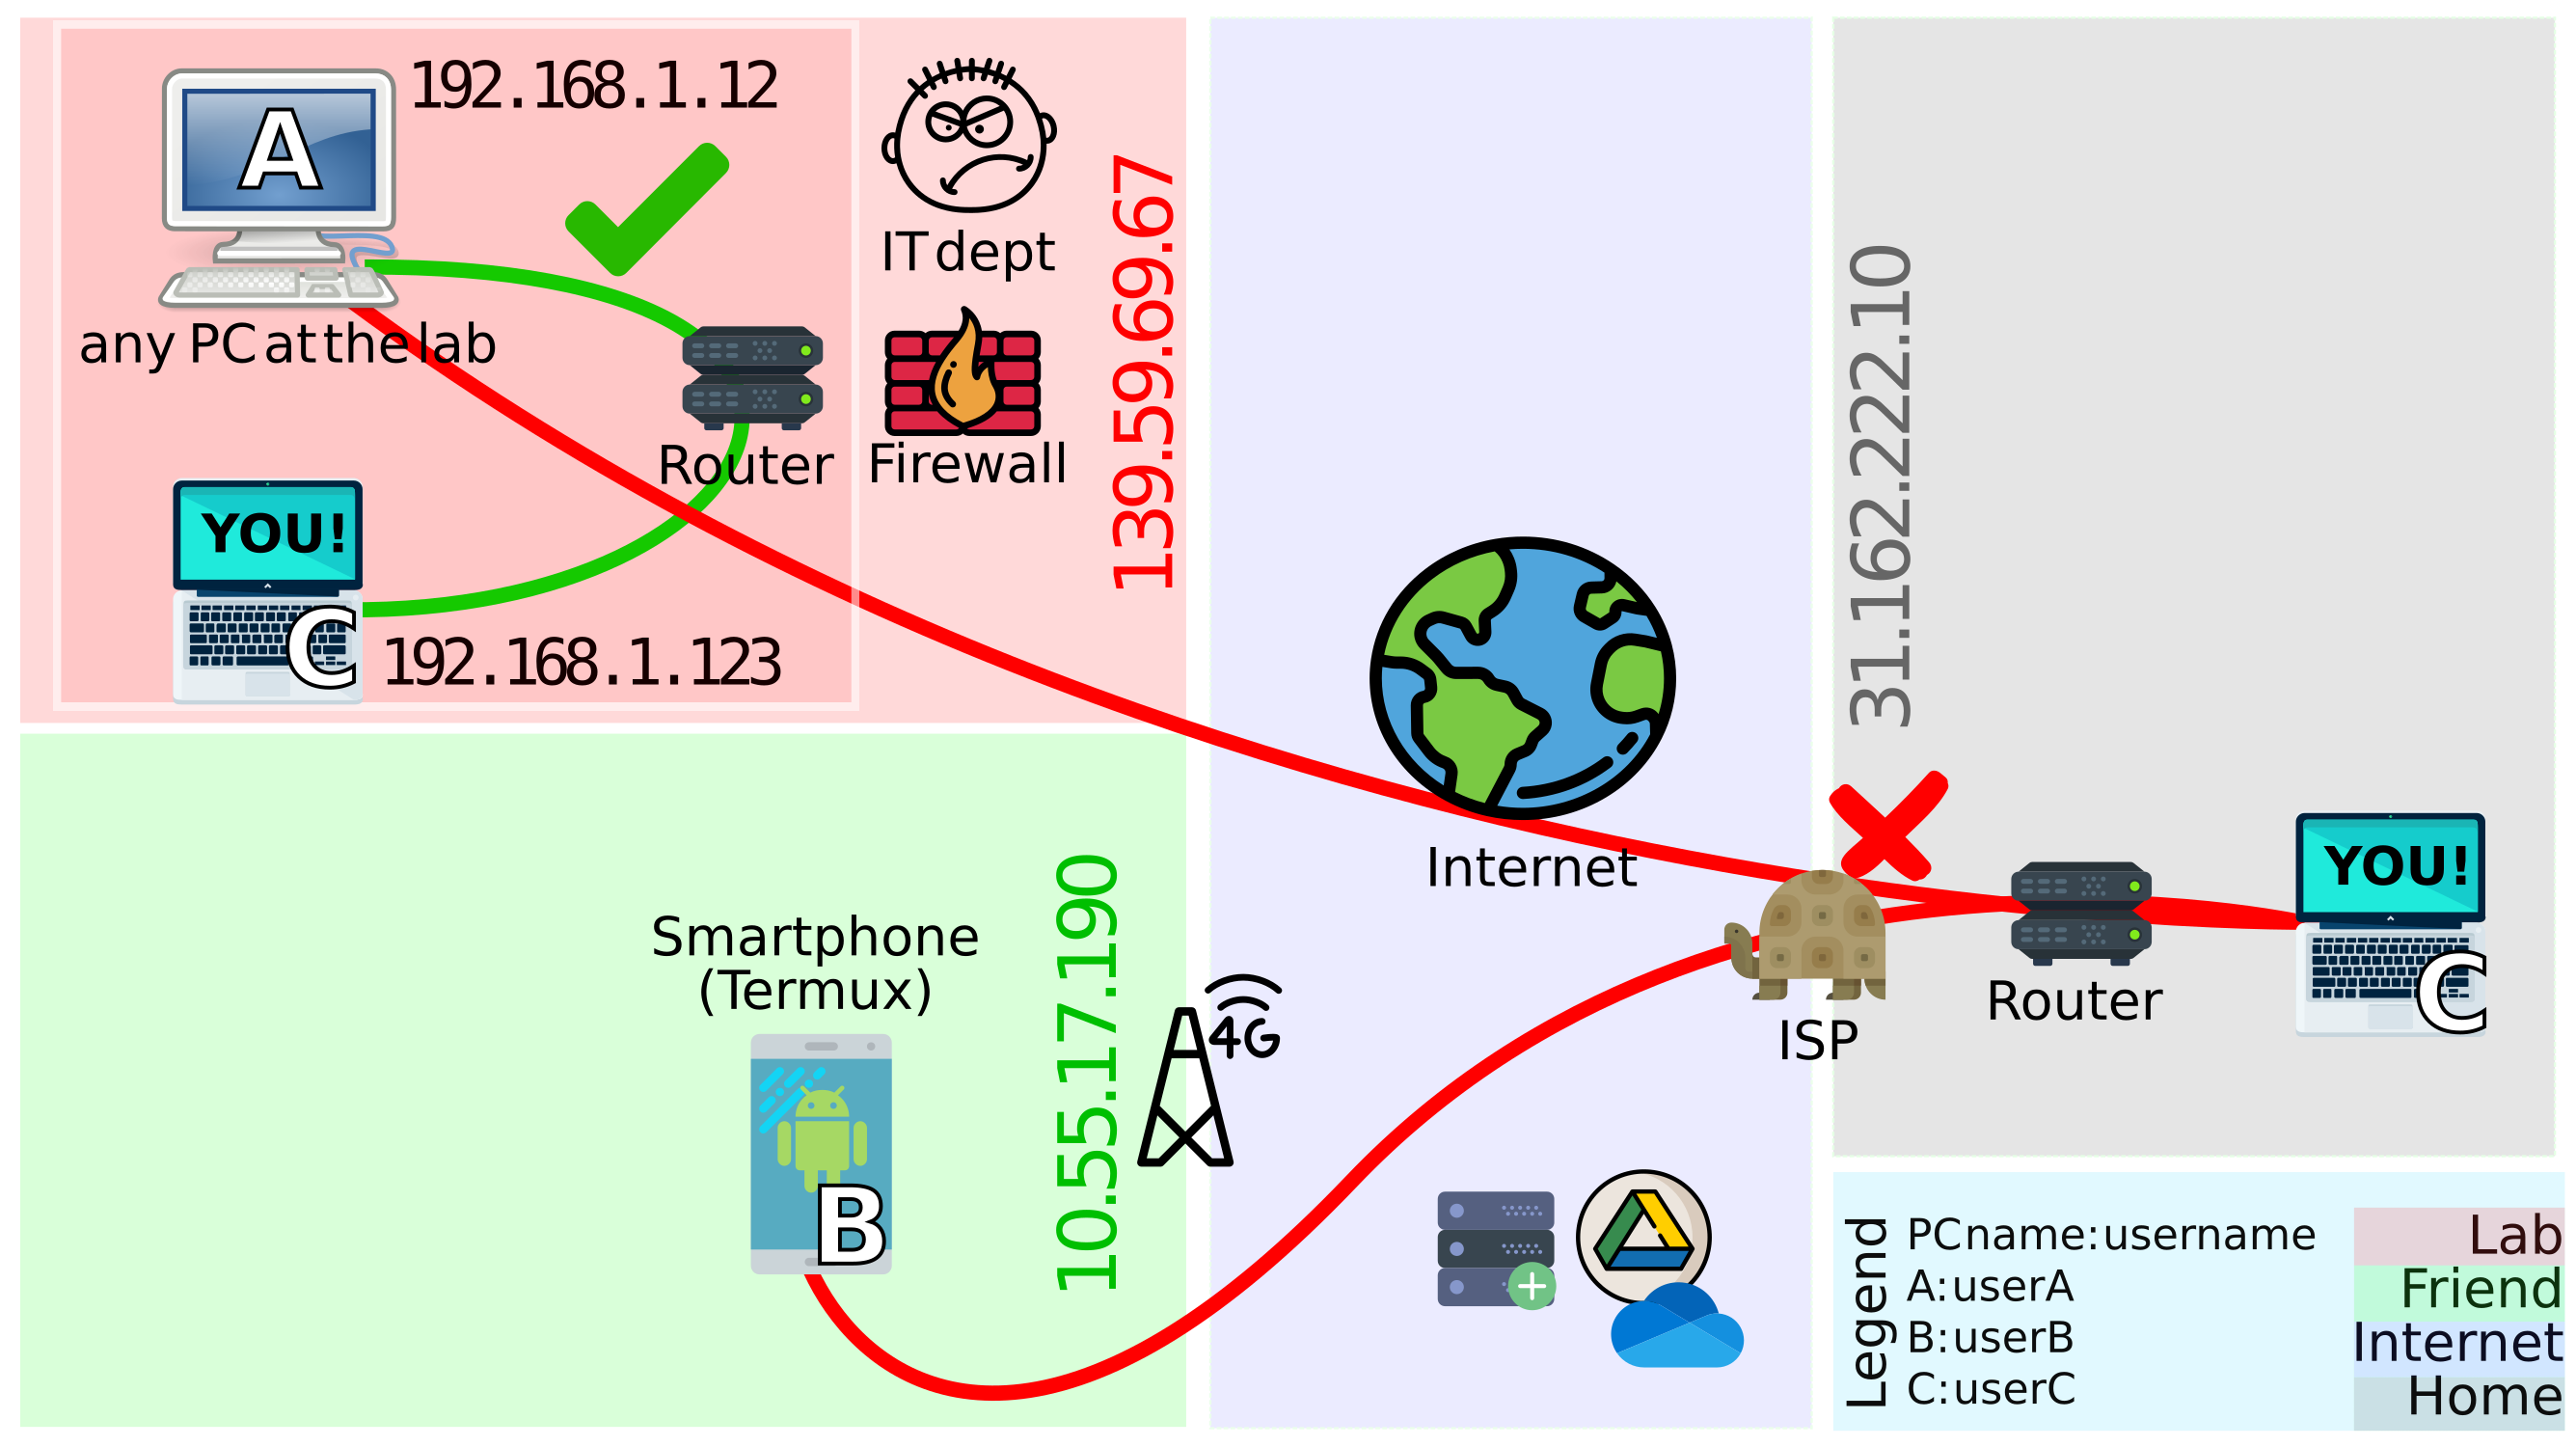
Figure 2: What can be connected straightaway ✅ and what cannot ❌
[^1: sidenote] Maybe even a router isn’t needed to connect A and C in the red area. Two computers can directly be connected using a single ethernet cable, but in the absence of an IP resolver like a router, the IP addresses for both A and C must be static and in the same subnet mask. Also, the ethernet cable that might be required could be a crossover-cable like CAT-5e/CAT-6.
Chapter 3: Open your heart to the internet (connect B and C)
Asking people to hand out their credentials could discourage them to try out our nice method. So the efforts could stay focussed on C’s side than B. Only one of them needs to follow the steps below. So, what does C have to do to make B connect to it? In such an arrangement, C becomes the server side and B becomes the client side.
- Allow incoming connections to
Cby opening a port on the main router. PC Magazine defines Port forwarding in the following manner:“Port forwarding is commonly used to make services on a host residing on a protected or internal network available to hosts on the opposite side of the gateway (external network), by remapping the destination IP address and port number of the communication to an internal host.” bala-bala boom technical skip~~
Here is an example of a router configuration page ready for opening a port, which usually located on the address
192.168.0.1, and can be accessed through a browser. (Sidenote: If router settings are not accessible, then Chapter 4 could be helpful)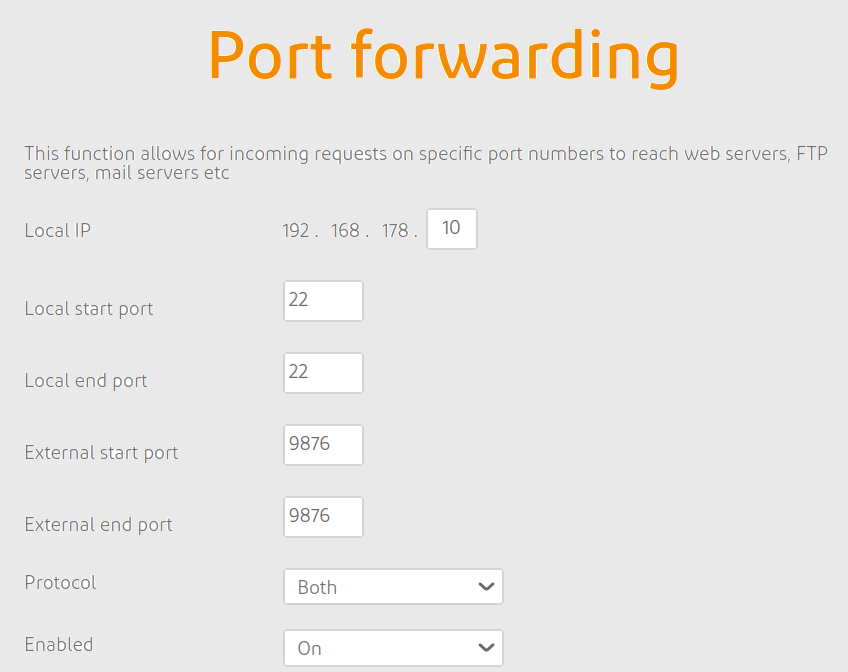
Figure 3.1: Router settingsThe snip above advices that one can refrain from using the default
sftp,scp,sshport numbers like port 21 or port 22 as an external port. It is a standard practice to use a higher (arbitrary) port number for security reasons. If multiple local computers are to be accessed, then one could choose a different external port for that particular local IP, which again maps to the new computer’s local port 22. - After successful creation of a port forwarding rule, a
sshserver can start running onC. If its the first time that such a connection is being established, it is recommended to setup a public and private key. Ansshserver can be started onCby:sudo apt-get install openssh-server sudo systemctl enable ssh sudo service sshd restart ssh userC@localhostWith the last command,
userConCwouldsshinto itself, giving back the terminal after successful login. - The friend
Bwho hasC’s ip-address 🏠 (31.162.222.10) can now arrive at the port ⚓ 9876 (set in step2). After arriving here,Bcan ask ifCcould help accessuserC’s files. If observed carefully, the bytes on Port 9876 are being mapped to Port 22 by the router in the grey area. Also, it seems likeCwent ahead and got a domain namemyserver.mooo.com, soBdoesn’t have to remember the address31.162.222.10, how thoughtful is that ❤️.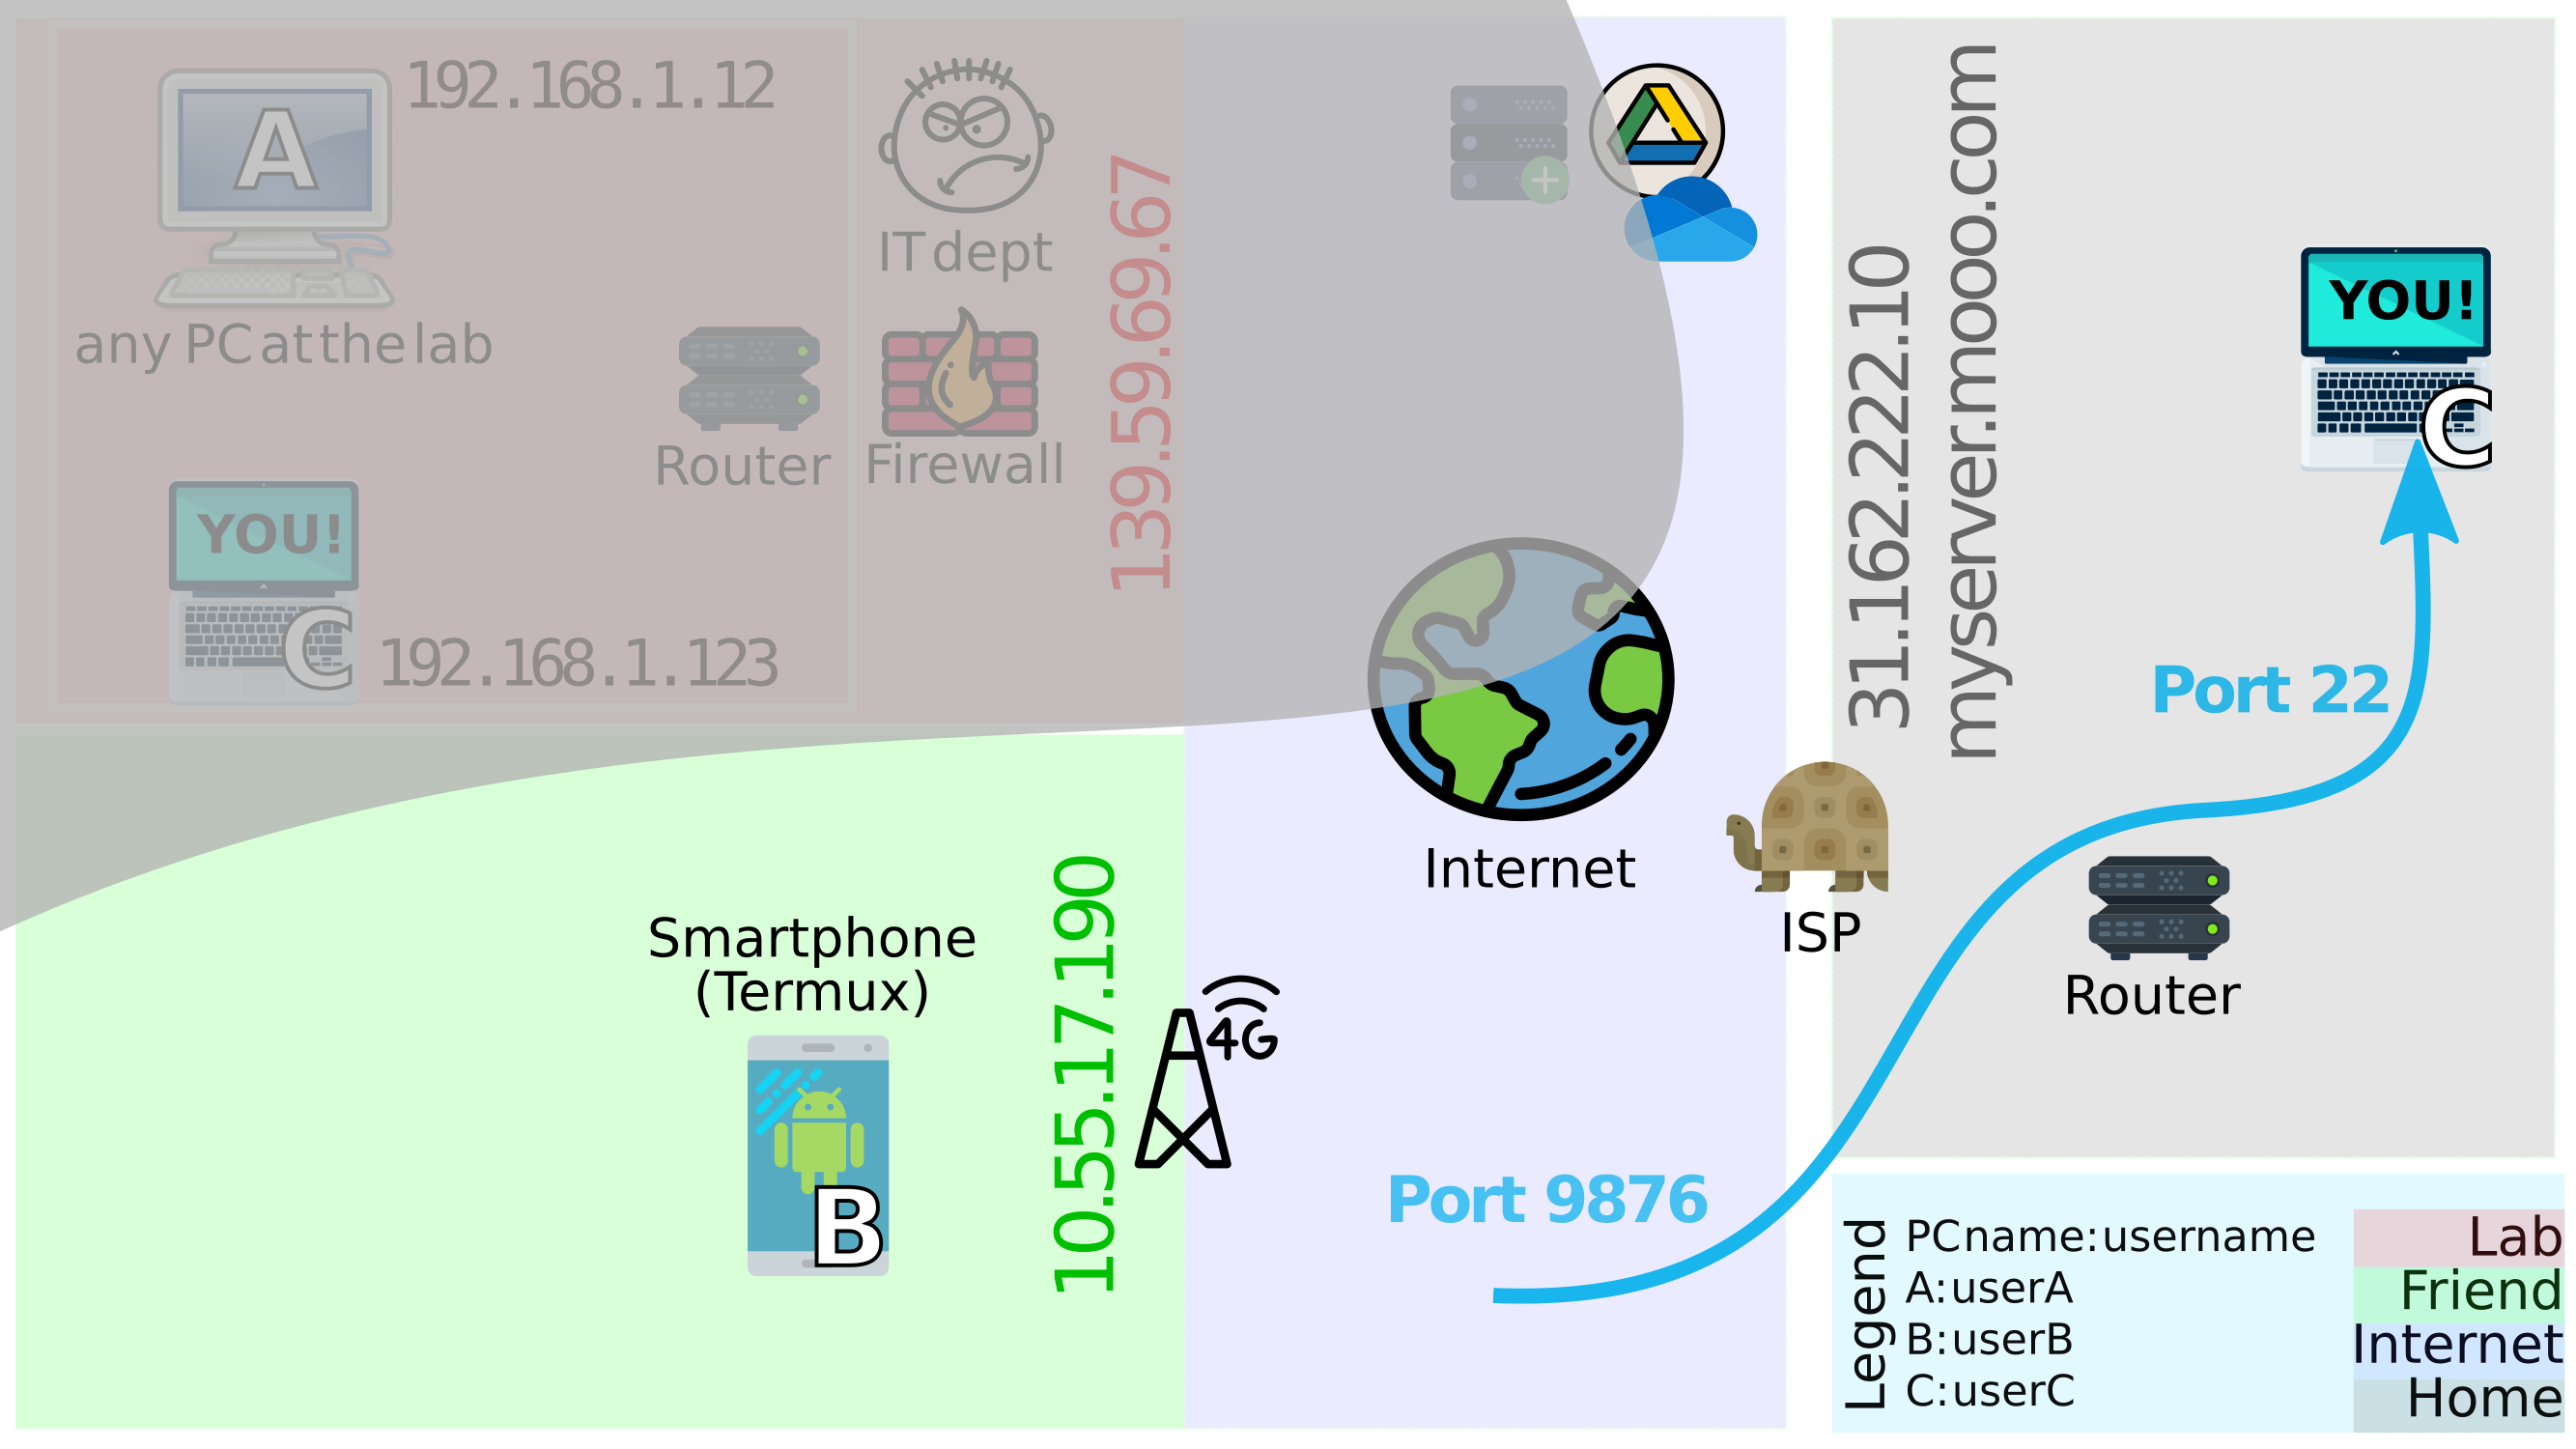
Figure 3.2: Global address to reach C: 31.162.222.10:9876 - After making
Ca global citizen, there are only two commandsBhas to enter in the termux application now:pkg install openssh ssh -p 9876 userC@myserver.mooo.comor
ssh -p 9876 userC@31.162.222.10scpcommands follow from the above commands that initiate a file exchange. File exchange could be fromBtoCor fromCtoB. However, the initiative of exchanging files in either direction can only be taken byB. The command below copies~/share/file1.txtfromC, ontoB’s smartphone. The second command moves it toB’s sdcard.scp -P 9876 userC@myserver.mooo.com:~/share/file1.txt ./ mv file1.txt ~/sdcard/Downloads
After this point on, I started looking at ssh as a “request”. This request can only really reach a server iff the router to which the server is connected to decides to forward such requests to it. After this point, the term Port-Forwarding started looking less abstract to me. After the correct Port-Forwarding configuration, three things need to go right in the ssh request command: the username active on the server, the server’s ip-address and the port that openssh is running on. Even after such a request reaches the server, the server can decide whether or not to give access to the client. It may so, iff the correct password was entered or the server already has the client’s id-rsa.pub in its authorized-keys list.
Ideally, this also works between the lab computer A (red area) and the home computer C (grey area). A’s side would never have to make any port-forwarding settings and A can always request ssh access from C if the port is open on C’s side.
Chapter 4: Convince the IT dept (connect A and C)
With the steps above, it marks our goal almost complete, after having a connection established between all the three, i.e. A, B and C. However, we don’t live in an ideal world 😿 What if one doesn’t have access to the router settings in the grey area? Living in a shared apt? 🤨 This is how the scenario looks pictorially:
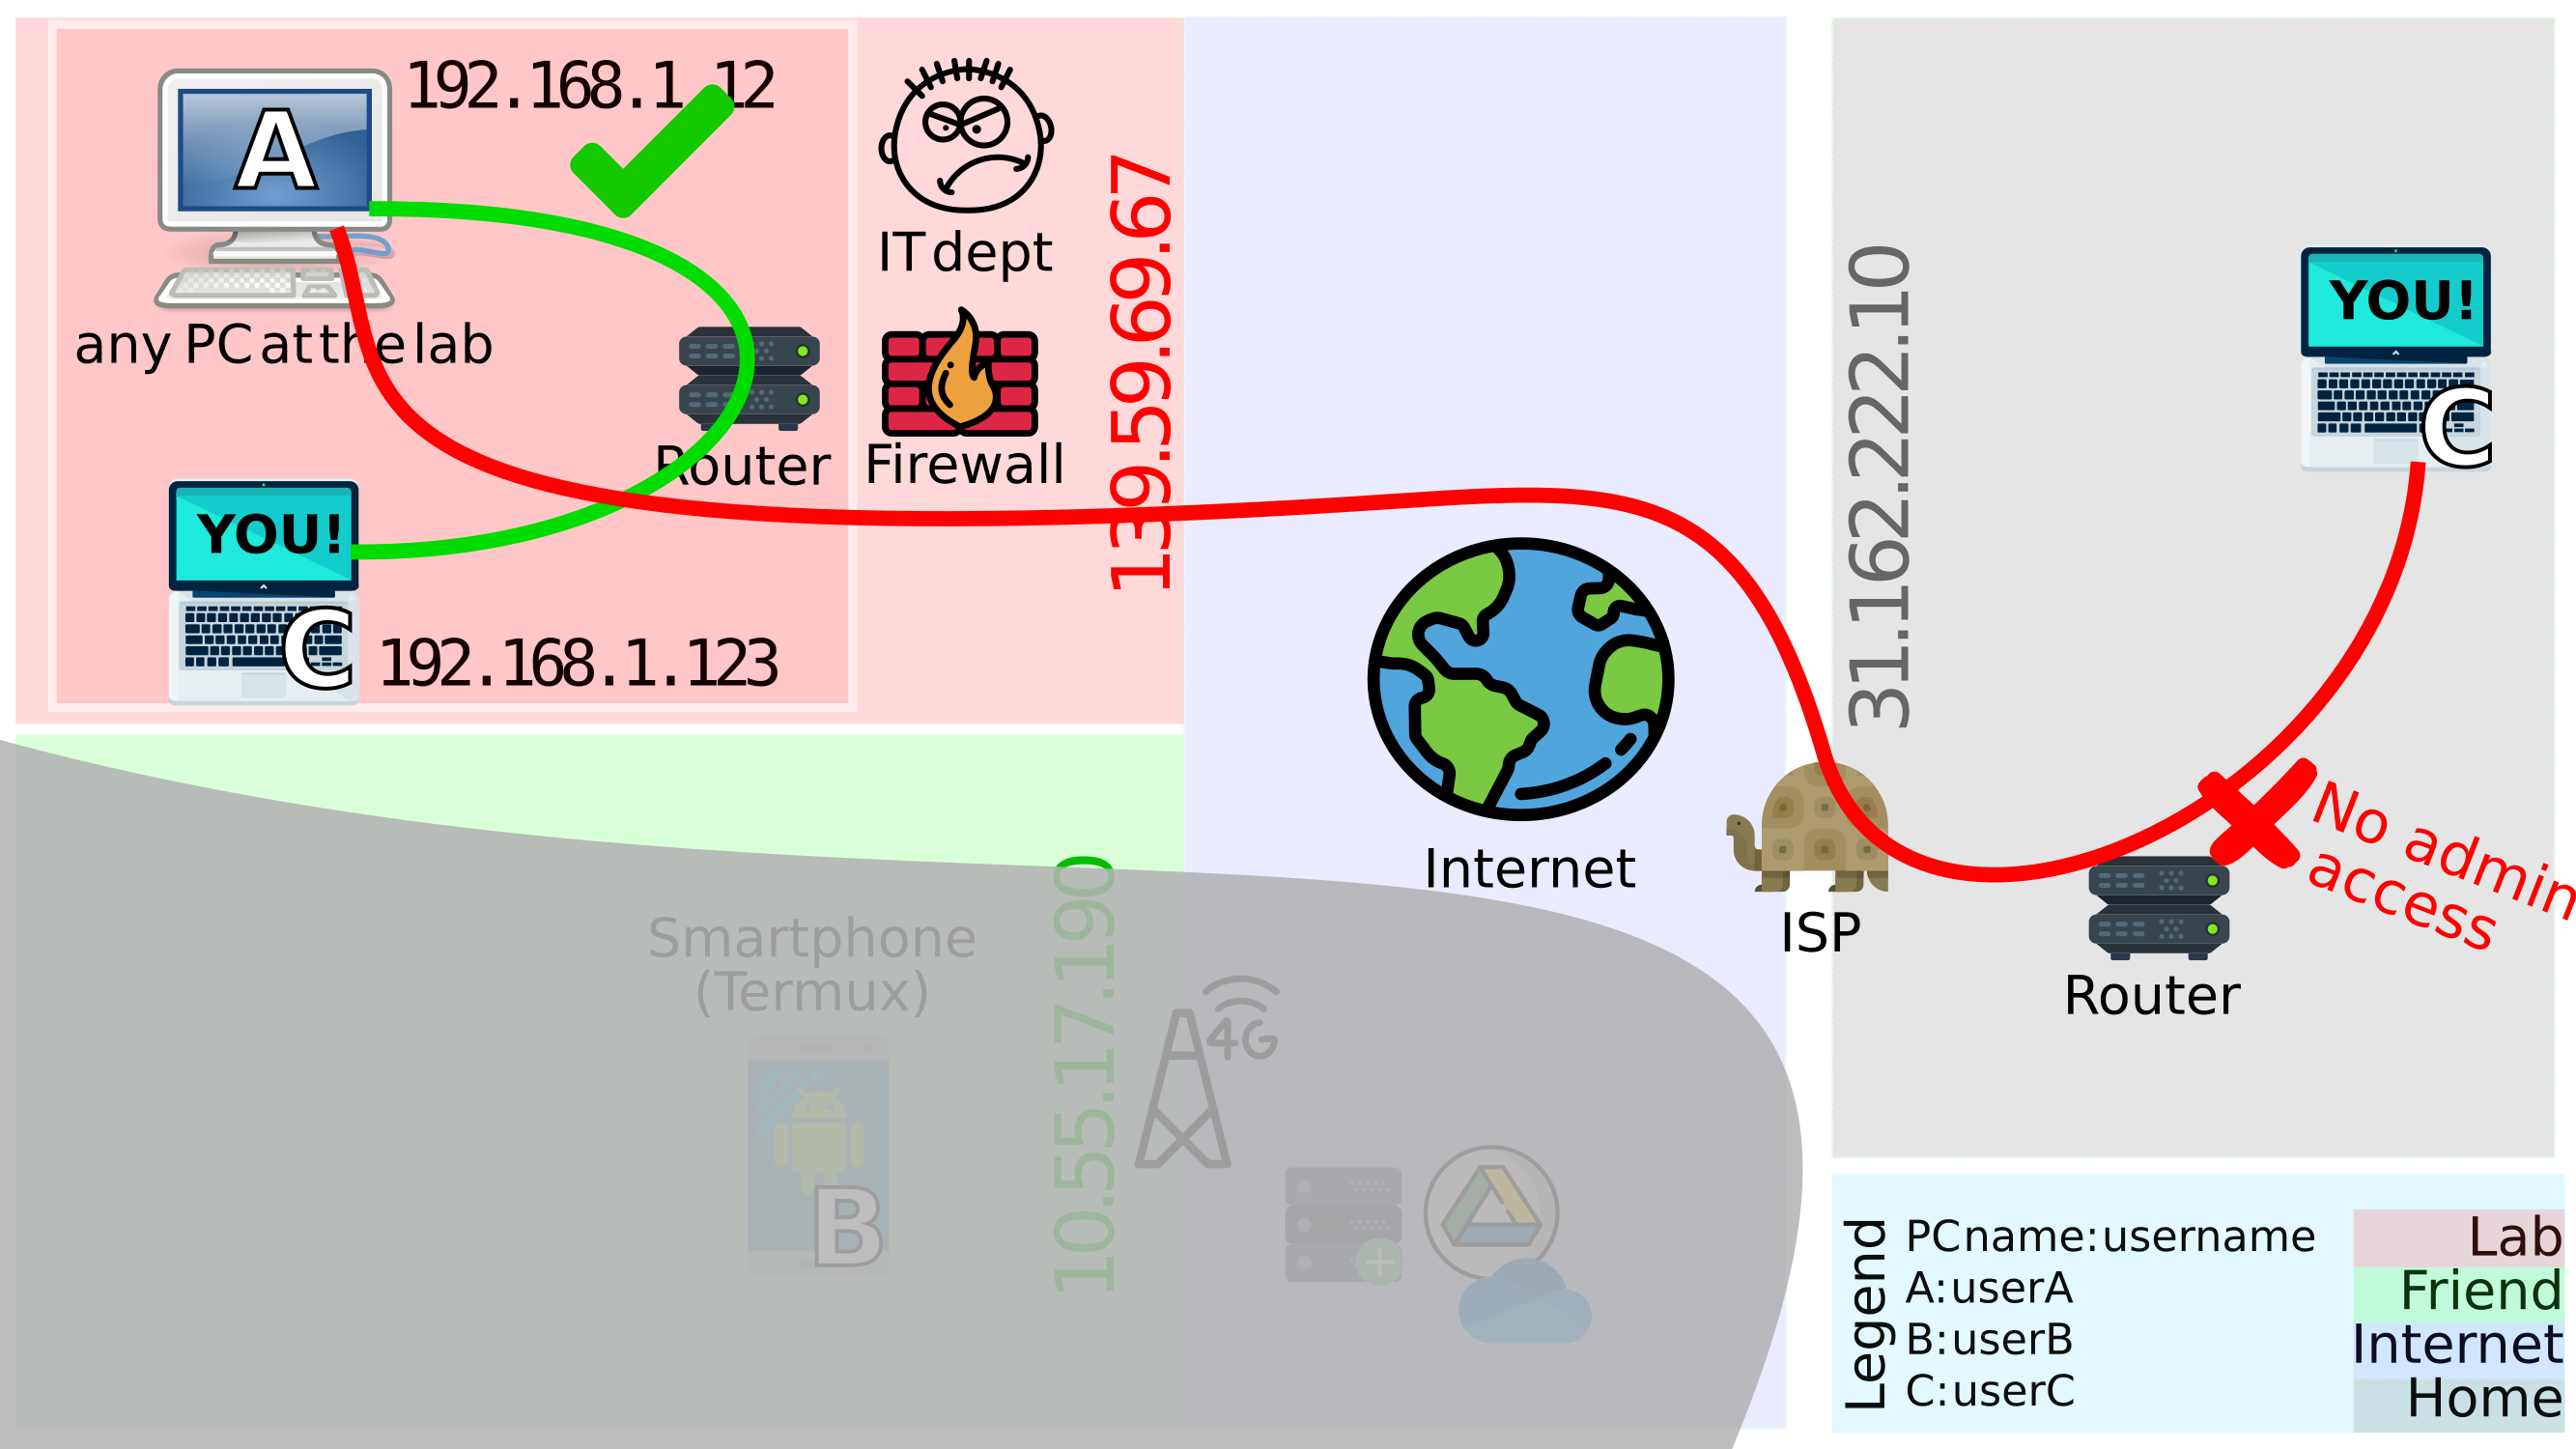
Figure 4.1: New goal: connect `A` in red area with `C` in grey area, without access to the router in the grey area
A suggestion that can convince IT is to configure an additional jump-server, which in itself stores no data but only acts as an intermediate computer through which a lab computer can be accessed. Is it still risky opening a port on it? Yes. But the uptime on A is reduced, while the jump-server takes the hits from intruders. Besides reducing the vulnerability of A, there are other benefits of setting up this jump-server:
- Could convert it to a Network storage device (NAS)
- Could host a webpage on port 80.
- Could host an OpenRollerCoasterTycoon2 server; build a theme park with friends? (Thanks to Chris Sawyer for giving us a fun-filled childhood).
The jump-server doesn’t have to be a full desktop computer nor does it need to run a GUI. So I tried flashing an Ubuntu 20.04 server image on Banani Pi M2 zero (€15 computer) which works flawlessly.
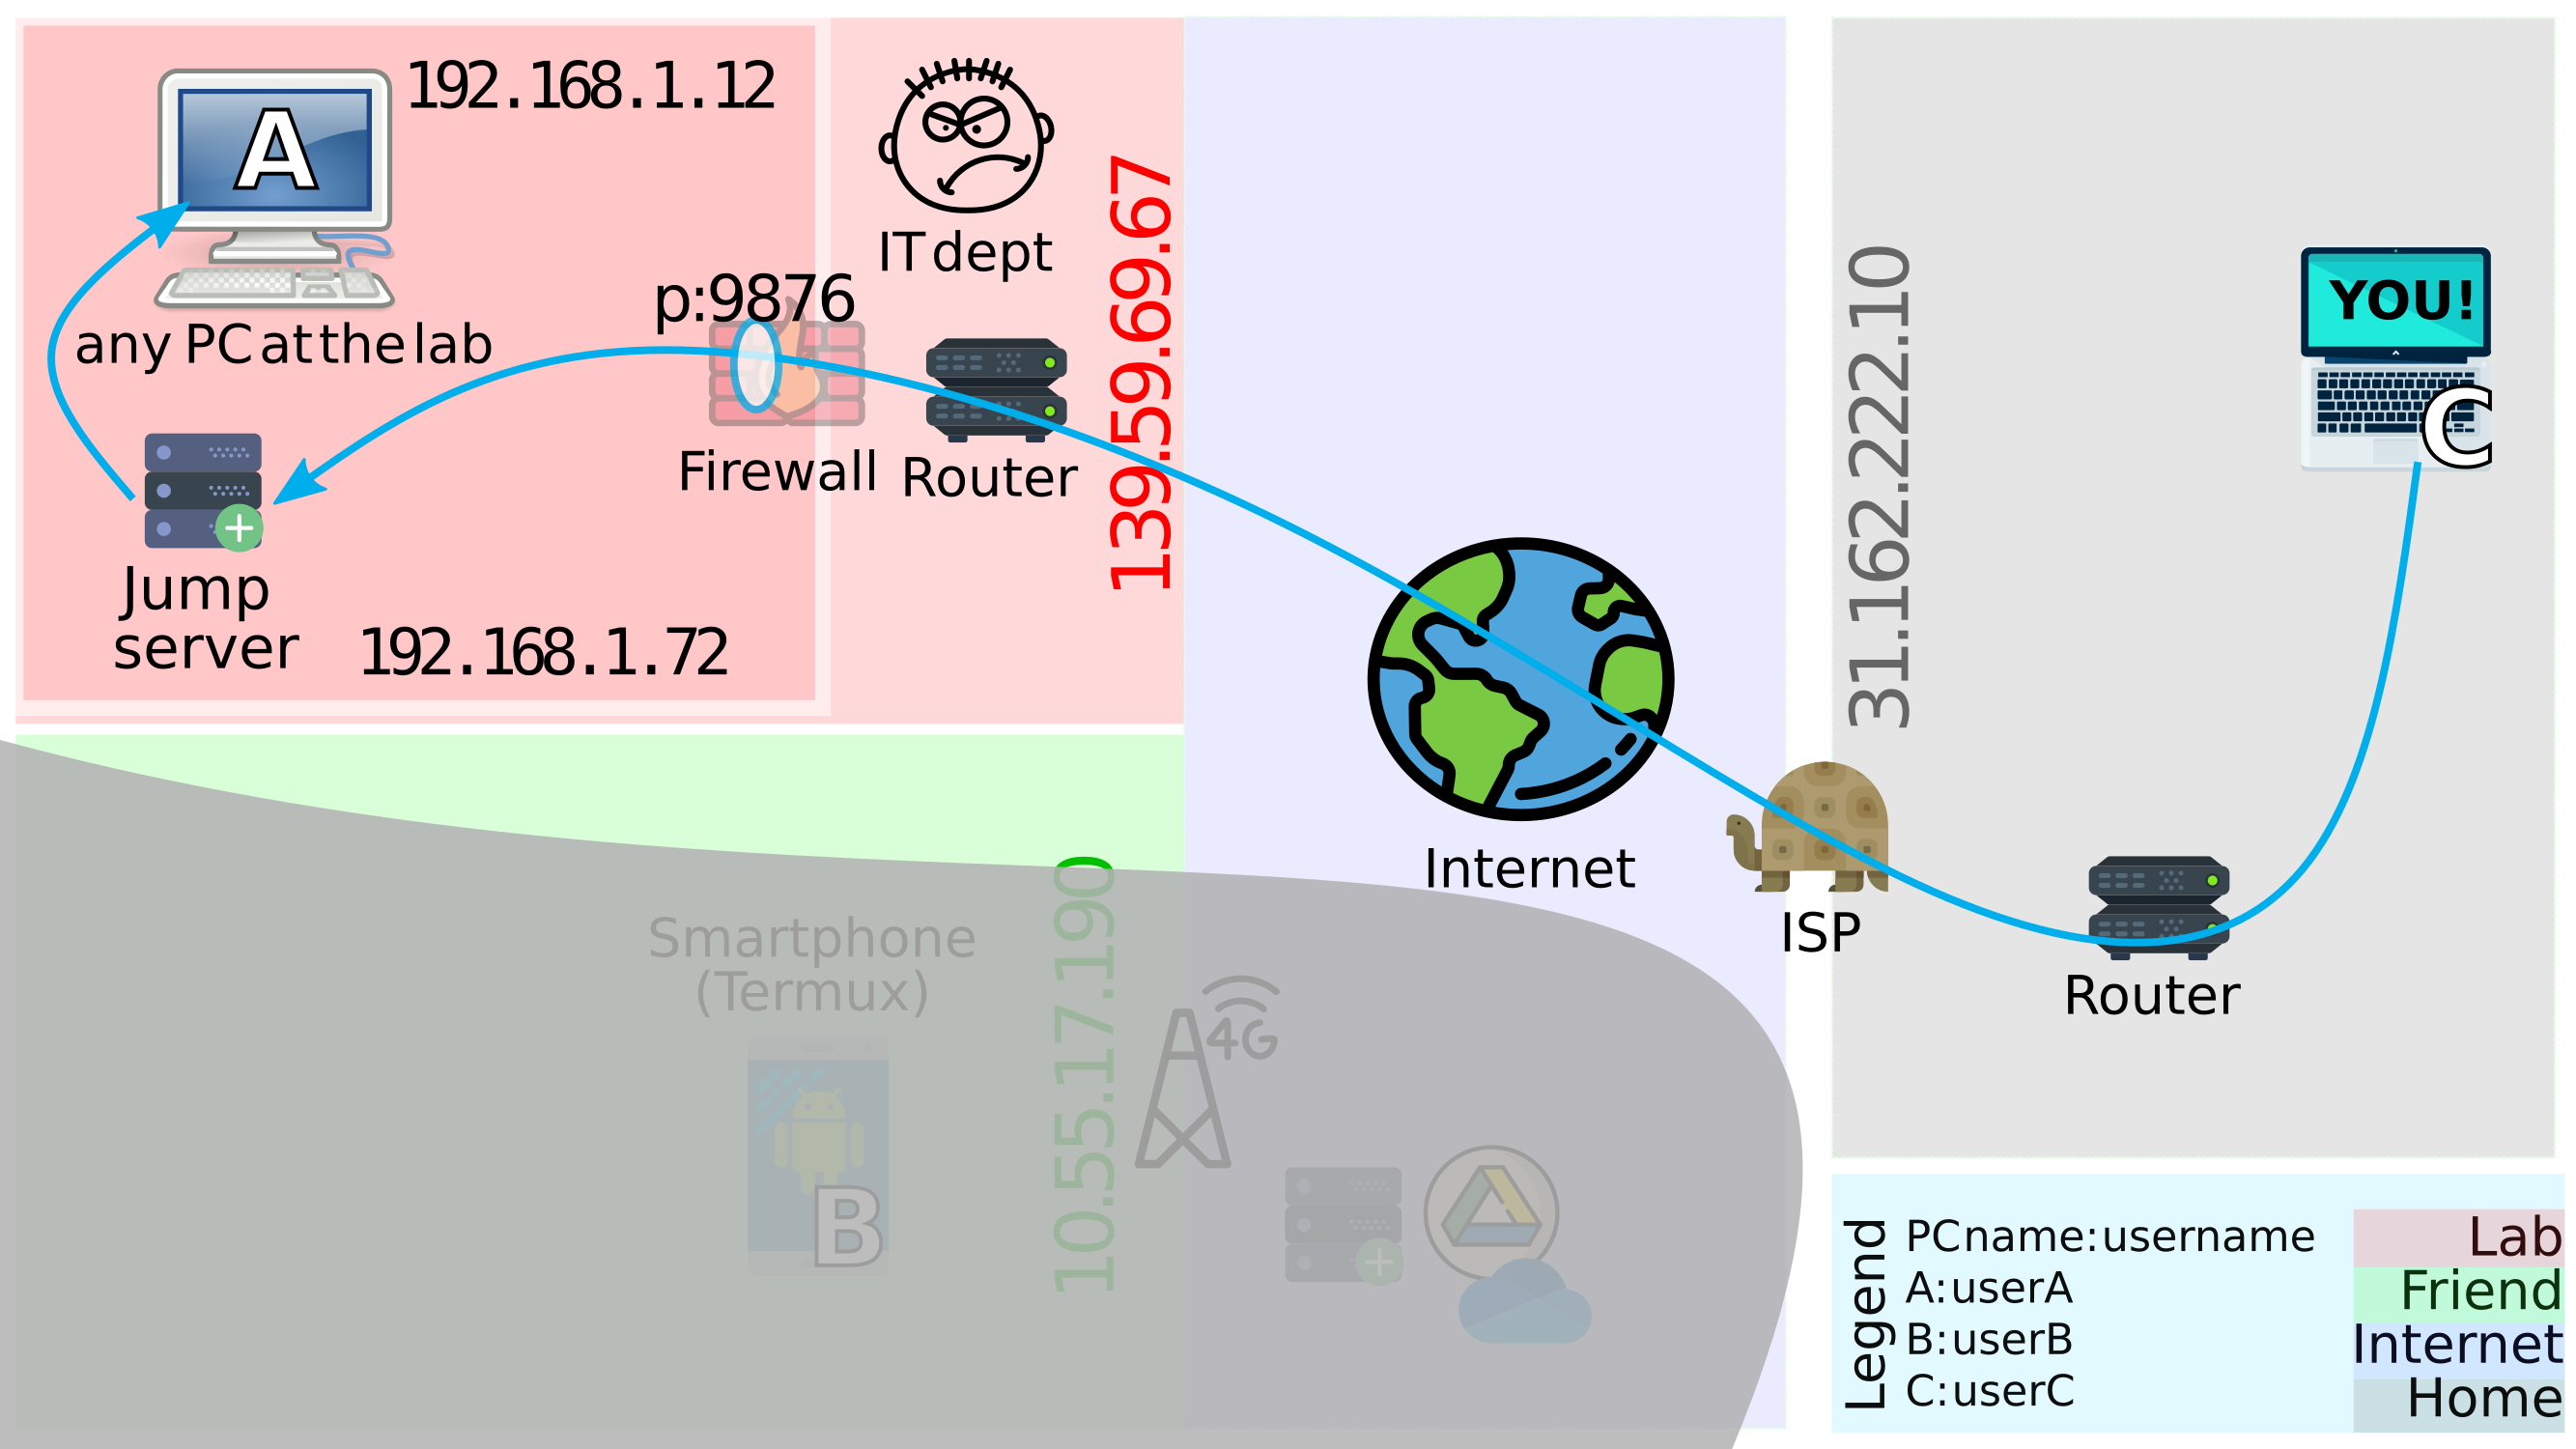
Figure 4.2: Adding a jump server
Removing clutter from the figure above, the configuration looks like this:
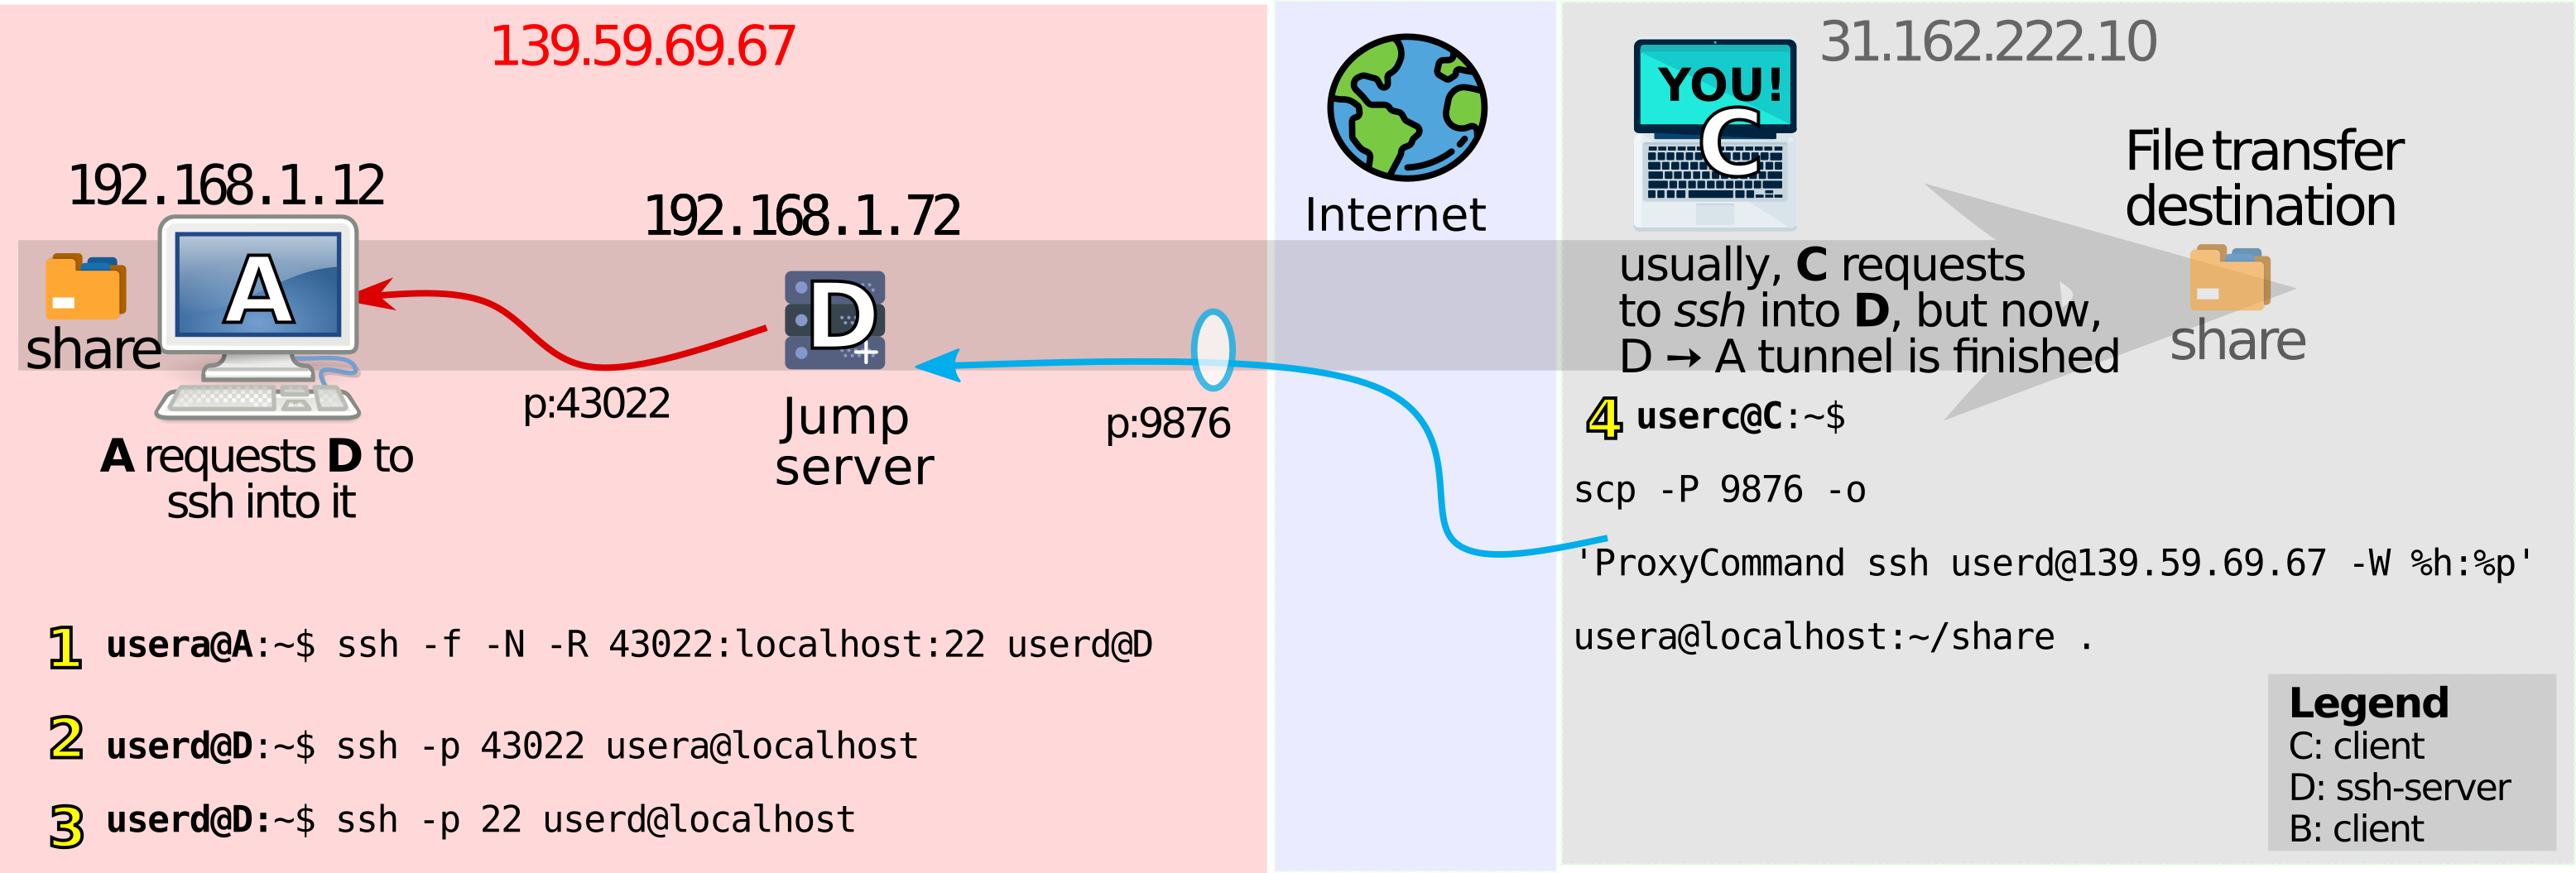
Figure 4.3: Tunneling!
Figure 4.3 refreshes the objective: we’d like C to enter A via D, so that it can copy the “share” folder from A. The steps to do so are highlighted in yellow in Figure 4.3.
-
Clients usually request access to a remote ssh-server using the basic
ssh user@ip_addrcommand. In our case, the remote ssh-serverDmust be able to ssh into clientA. For such an inverted operation, reverse-tunneling can be used. By executing step 1,usera@A:~$ ssh -f -N -R 43022:localhost:22 userd@DAinvitesDto connect via port 43022 and access it. (A few don’t prefer calling this reverse tunneling, because the-Rargument of step 1 stands for remote and not reverse). -
By executing step 2,
userd@D:~$ ssh -p 43022 usera@localhostDmakes sure it can enterAvia the newly opened tunnel. A remote server is now getting access to a client! Uncommon right? -
Step 3 is supposed to be skipped. It just illustrates that on
D, there are two “localhost”s. One with usernameuserdon the default port 22, and one with usernameuseraon the port 43022. Using the appropriatesshcommand allows accessing both users. -
Step 4
userc@C:~$ scp -P 9876 -o 'ProxyCommand ssh userd@139.59.69.67 -W %h:%p' usera@localhost:~/share .is the final
scpcommand that transfers the share folder fromAs~/sharefolder to the current directory. Unlike Chapter3, no router settings were changed onC’s side. The trouble of port-forwarding was moved to the red area.
That was about it 🏁.. Basically Chapter3 demonstrates how to ssh in a quick way, while Chapter4 used a jump-server adding a few more steps. The appendices below cover a few fun aspects around ssh.
Appendix A: Increase security 🔒
1. Change configurations
Raspberry Pi gifted the world a nice single board linux computer (SBC). Most of these SBCs are accessed over ssh running on the default Port 22. A few don’t change the default username and password after setting up. It is easy for someone to guess that there could be a username pi, with password raspberry giving users access over Port 22 if it is left open to access from the outside.
So change all three ![]()
- Change the default
sshport in/etc/ssh/ssh_config, lets say tox. Now map this newxport to a different portyin the PortForwarding settings of the router. Neitherxnoryis22anymore. Not to forgetsudo service restart ssh/sshdafter changing anysshconfigurations. - Change the default username and password if using an
Rpiboard 👍
2. Make the journey difficult
Could make someone’s journey to access computer C by introducing an extra jump server. The jump server’s responsibility is to just forward packets. The intruder spends time figuring out credentials of something which inherantly carries no data on it.
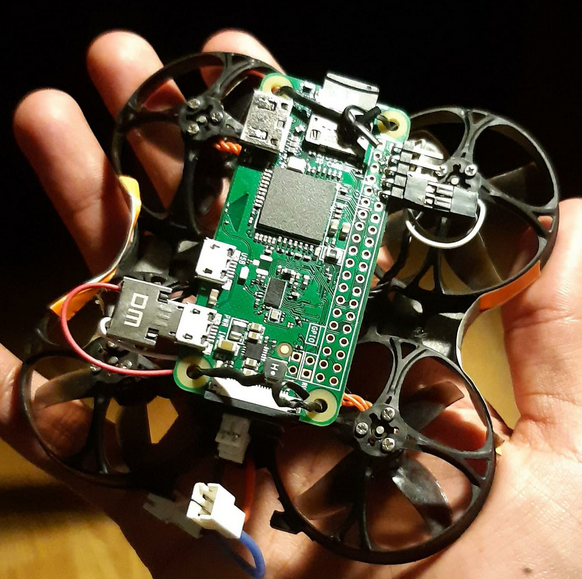
Could salvage an extra jump server from the Rpi-Zero of our drone
3. Make the destination not worth it
There could be a separate user account on C named newuserC, which just shares the folders with the original userC. Sharing could be limited to reading the files and no writing permissions could be granted to newuserC. ssh connections are now initiated by this newuserC.
| user | access |
|---|---|
| userC | +rwx |
| newuserC | +rx |
On userC, give newuserC read and execute access to a folder share
mkdir ~/share
sudo setfacl -m u:newuserC:rx ~/share
on newuserC, symbolically link the earlier made share folder
ln -s home/userC/share share
4. Only you
Internet protocols work hard to make sure that only the correct computer and no one else receives the packets which are addressed to you. However, someone could work hard to sniff this packet - maybe after they found out that one of our ports is open and they’ve identified that we could carry some sensitive information (which is usually more important than the PyTorch network that just finished training). Let’s say they could find a way to intercept our bytes.
Since we are always using the ssh or scp commands, our packets are always encrypted and the intercepted bytes mean nothing to the intruder unless they also have our public and private key (usually stored in ~/.ssh/id_rsa.pub and ~/.ssh/id_rsa) 🔑. NetworkChuck gives 5 quick ways to increase the security of your linux server even more (highly recommended).
Appendix B: Connection metrics 📊
Commands below could help identify the bottlenecks in the connections between a source and destination computer. Are the packets wrapping the Earth following a longer path around the radius? That’s not how the internet protocol is written to work, so a packet from NL to USA shouldn’t route through IN unless some underwater cable in the Atlantic gave up.
1. Transfer speed
iperf3 🏎️ can calculate the average transfer speeds one can expect between a source and the destination. Command at the host/server side (at myserver.mooo.com):
apt-get install iperf3
iperf3 -s -p 9876
Command at the destination/client side:
apt-get install iperf3
iperf3 -c myserver.mooo.com -f K -p 9876
2. Transfer route
traceroute ![]() helps locate the intermediate nodes from which the packets are travelling through before reaching their destination. A round trip time (RTT) to all intermediate nodes between the source and destination is added to a final latency value in milliseconds. Should RTT = 2 * distance/speed? I’m not sure
helps locate the intermediate nodes from which the packets are travelling through before reaching their destination. A round trip time (RTT) to all intermediate nodes between the source and destination is added to a final latency value in milliseconds. Should RTT = 2 * distance/speed? I’m not sure ![]() We just had sunset in Europe and doesn’t it look pretty from up there?
We just had sunset in Europe and doesn’t it look pretty from up there?

Tracking the packets as they bounce around the world
Command at the destination side:
traceroute myserver.mooo.com
Excited to see how this command would behave on a starlink network 🛰️. Do they route through the inter-satellite laser or bounce via ground stations?
Appendix C: Misc
- Append
~/.ssh/id_rsa.pubof your computer to~/.ssh/authorized_keysof a server to prevent typing passwords all the time. - Run an expect script (
.exp) to automate a repetitive task likesshing into, execute file transfers viaspawn scp, to dump files back from your server to your local. - Use
rsyncinstead ofscpto only download the changed files in a destination. - Install
JuiceSSHon android to replacetermux, but requires paid versions for configuring jump servers. -
winscpfor windows can also handle jump servers, and above methods can work after switching the protocol toscpinstead offtp.
References 📖
- Tinkernut on Port forwarding
-
Thanks to Nirali for enthusiastically volunteering to try this out despite the cryptic steps involved 🌱